Next: Resonance in a Series RLC Circuit
Up: AC Circuits
Previous: Frequency Dependence of Impedance
In this part of the experiment, you will connect
R, L and C in series with a signal generator
and use the oscilloscope to measure the magnitude of the voltage
across each circuit element and the relative phase of each voltage
with respect to the voltage of the signal generator.
The oscilloscope and the signal generator must share a common ground,
so you will have to rearrange your circuit each time
you measure the voltage across a different circuit element.
For example, to measure  the arrangement could
be as shown in Fig. 9.9:
the arrangement could
be as shown in Fig. 9.9:
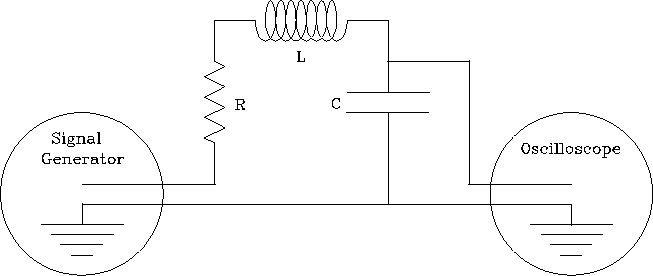
Figure 9.9: Measuring
.
but then to measure
 , the inductor would need to be
attached to the ground of the signal generator
as shown in Fig. 9.10:
, the inductor would need to be
attached to the ground of the signal generator
as shown in Fig. 9.10:
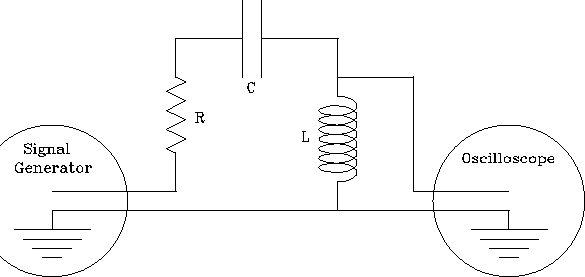
Figure 9.10: Measuring
.
- Measure the magnitudes of
 , and .
 - Measure the phase shifts between these voltages
and the the voltage V of the signal generator.
For the phase measurements, the signal generator is used as an
external trigger to the oscilloscope.
In this mode (SOURCE button pushed to EXT),
it is the phase of of the input to the external trigger
rather than the phase of the vertical input
that triggers the start of the sweep, so that the relative
phases of the two inputs can be compared.
For measuring phase shifts,
- First center the pattern vertically
by pushing the ground button in and adjusting
the resulting line to coincide with the center line of the grid.
Then, let the ground button out.
- With the output from the signal generator as the vertical input to the
oscilloscope (as well as the external trigger input), adjust the time/div
selection switch and the variable horizontal scale knob so that one cycle
(or one-half cycle) covers nine centimeters - a convenient scale for
measuring phase shifts as each centimeter represents 40 (or 20) degrees.
Position the trace horizontally so that one (or two)
of the center line crossings coincides with a vertical grid line -
your reference line for the next step.
- Use , or as the vertical input
and keep the signal generator as the external trigger input.
The horizontal change in position of the center line crossing
is the phase shift you wish to measure.
Sketch the trace in your lab notes
so you can remember the direction of the phase shift.
Remember that a positive shift moves the pattern to the left.
- From the measured phase shifts,
determine the phase shifts between and
and between and . How do your values
compare with what you expect?
- Assuming that the value of R is known,
determine (from R, the voltages and the frequency)
values of C and L. Compare the phase shift of the current
relative to the driving voltage that you calculate from R,L,C
with the measured value.
- Compare your experimental results with the values of
L and C labelled on the devices.
Next: Resonance in a Series RLC Circuit
Up: AC Circuits
Previous: Frequency Dependence of Impedance