Up: Geometrical Optics
Previous: 6.2 Refraction
A lens is merely an optical system which includes
two or more refracting surfaces.
From the geometry of light rays, it turns out that
spherical refracting surfaces are most interesting and practical.
We define the first focal point of a lens to be
the point  such that if a point source
of light is placed at , all rays will be parallel after passing
through the lens. Similarly, the second focal point
such that if a point source
of light is placed at , all rays will be parallel after passing
through the lens. Similarly, the second focal point  is the common point where formerly parallel light rays meet
after passing through the lens. In the case of a lens which is
relatively thin compared to the distance from one surface
to or , the first and second focal lengths are the
respective distances from and to the center of the lens.
If the refractive index of the materials on either side
of the lens is the same (e.g. if the lens is in air),
the first and second focal lengths are equal to a common value f.
is the common point where formerly parallel light rays meet
after passing through the lens. In the case of a lens which is
relatively thin compared to the distance from one surface
to or , the first and second focal lengths are the
respective distances from and to the center of the lens.
If the refractive index of the materials on either side
of the lens is the same (e.g. if the lens is in air),
the first and second focal lengths are equal to a common value f.
If, in a thin double convex lens, we take
the radius of curvature (  ) to be positive
for both surfaces, we can derive the equation
) to be positive
for both surfaces, we can derive the equation

where n is the refractive index of the lens material.
In a lens system the image of an object often appears
to be larger than the object itself;
this is referred to as magnification.
If s is the distance from the object to the lens
and  the distance from the lens to the image,
then the magnification m is given as
the distance from the lens to the image,
then the magnification m is given as

Moreover, if d=s-f (i.e. distance from the object
to the closest focal point) and  , then

In this part of the experiment you will verify these
theoretical results and investigate the distortion
(called aberration) that spherical lenses introduce
into images.
- Position the incandescent light source
at the left end of the optical bench.
- Attach a double convex lens to one component carrier and
the viewing screen to another.
- Position the lens and screen at the extreme right end of the
bench so that the lens is between the light source and the screen.
The further the lens is from the light
the more parallel are the rays entering the lens.
- Adjust the position of the screen
until the image is as thin as possible.
Then the distance between the middle of the lens
and the screen is an approximation of the first focal length.
Enumerate all the possible errors.
Find the focal length of the other double convex lens.
(The focal lengths of the plano-convex lenses
are so large compared to the length of the optical
bench that the incident light rays are not parallel enough
to measure the focal length with any accuracy.
We will use another method outlined below.)
- Attach the plano-concave lens
to one side of a component carrier and
attach the aperture mask to the other side.
Position the assembly about 40 cm from the light source.
- Place the screen behind the lens
and notice that as you move the screen further from the lens,
the image expands.
- Measure the image width and corresponding distance
from the lens to the screen for two different screen positions.
Using simple geometry, calculate where the rays
diverted by the lens would theoretically converge
at a point in front of the lens.
This is an approximation of the focal length.
- Attach a double convex or plano convex lens to a component carrier.
- The light source is a line filament, so if we consider
only lateral dimensions the source is essentially a point source.
The equipment instructions for the source
give the distance from the filament to the front surface of the
light source to be approximately 21 mm.
- Adjust the lens position so that the image on the screen
is the same width no matter where the screen is placed
(i.e. the emergent rays are parallel).
The distance from the lens to the filament is the second focal length.
Compare your result to the first focal length.
- You cannot use the above method to measure
the focal lengths of the 18 mm F.L. convex lens
or the -22 mm F.L. plano-concave lens.
These lenses cannot be positioned
sufficiently close to the filament.
Thus, as an alternative, place the 48 mm F.L.
double convex lens between the light
and the lens to be measured.
The focal point of the first lens now becomes
the point source for the second.
- From the formulae above, if the magnification m= 1.0,
then
 ,
,  and f=d.
Hence, at such a lens position,
and f=d.
Hence, at such a lens position,  .
. - Place a double convex lens or a plano-convex lens
between the crossed-arrow target and the screen.
(All the components should be on separate carriers.)
- Adjust the position of the lens and screen until the image is in
focus and is the same size as the original object. The target has
a millimeter scale on it. At the final
position, the distance from target to screen is four times the focal length.
- With the focal length, compute the radius of curvature for the lenses.
Assume
 for the double convex lenses;
the radius of curvature of a plane is infinite.
Also verify Gauss' formula:
for the double convex lenses;
the radius of curvature of a plane is infinite.
Also verify Gauss' formula:

- Position a double convex lens or plano-convex lens
between the crossed arrow target and screen.
- Adjust the position of the lens until the image is focused.
- Measure the distance from the target to the lens
and from the screen to the lens.
Calculate the theoretical magnification.
- Measure the actual magnification by measuring
the distance between the scale markings on the image
and compare with the theoretical value.
A spherical surface lens does not form a point image
of a point object originally positioned on the lens axis.
Instead, the image is a line segment collinear with the lens axis.
Thus, there is no exact screen position where the image is ``in focus''.
Conversely, the point object can be moved slightly along the axis
and still appear ``in focus''. The amount of movement
which maintains a given image sharpness is called
the depth of field.
- Position the 188 mm F.L. double convex lens
in front of the incandescent light source (about 30 cm away).
Attach a sharp razor blade to a component carrier
and position the assembly to the right of the 18 mm lens.
Adjust the assembly position until the razor blade is
in the focal plane of the lens.
The lens image on the razor blade should be a small dot.
- Carefully adjust the razor blade on the carrier
until the sharp edge cuts across the center of the focussed dot.
Place the viewing screen to the right of the razor blade
and examine the image. It should resemble one of the patterns shown
in Fig. B. Move the razor blade assembly slightly
forward or backward and observe the pattern changes.
The patterns will only approximate those in Fig. B
since razor edges are not usually optically perfect.
This technique is the Foucault knife test for lenses.
Convince yourself that the patterns are due to spherical
aberrations. Try using the 48 mm F.L. lens.
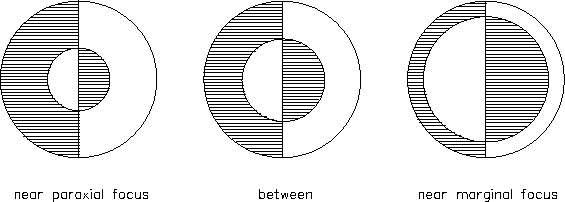
Figure B: Spherical aberrations.
- Place the variable diaphragm just in front of the test lens.
By varying the opening, notice that the patterns degenerate.
A small aperture gives a more unique focal point.
If you placed the crossed arrow target between the light source
and the variable diaphragm, you can observe that the point
where the image is in focus becomes more distinct
as the aperture closes. Thus, depth of field varies inversely
with aperture size. This phenomenon is familiar to photographers.
Up: Geometrical Optics
Previous: 6.2 Refraction