Procedure for filling Transfer Dewars
at the Liquefier:
This document
describes the procedure for transferring liquid helium from the Mother Dewar to
the Transfer Dewar when the liquefier is running. If the machine is not in
operation contact the cryogenic technician in charge of the liquefier or the
Physical Science Division (PSD) liquid helium coordinator before transferring.
The Transfer Dewars:
All the TRIUMF Transfer
dewars are CRYOFAB CMSH 350 LHe
containers with the following valve configuration (Figure 1).
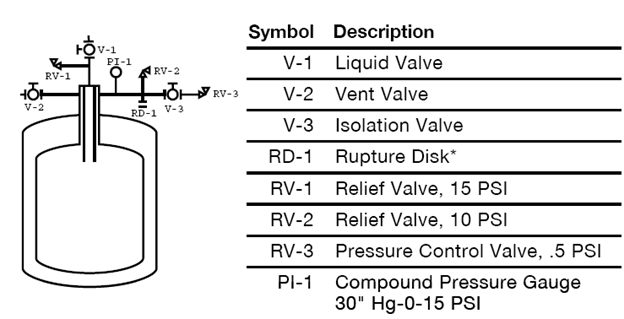
Figure 1: Transfer Dewars
valve configuration.
Dewars that are not in use should always have the
liquid valve (V-1) closed. If the dewar is being
transported around site, the isolation valve (V-3) should be open and the vent
valve (V-2) closed, this way the pressure in the dewar
can not exceed 0.5 psi. At all other times the cold dewars
should be connected to the helium gas collection system in one of the
designated holding areas outside M15, M20, ![]() NMR or the north wall of the Meson Hall. Under these conditions the normal evaporation
rate of liquid helium is low, quick connect fitting attached to the return
hoses are used to collect the gas. At these locations the vent should be connected to one of the return hoses, the
vent valve (V-2) left open and the isolation valve (V-3) closed (see Figure
2a and Figure 2b).
NMR or the north wall of the Meson Hall. Under these conditions the normal evaporation
rate of liquid helium is low, quick connect fitting attached to the return
hoses are used to collect the gas. At these locations the vent should be connected to one of the return hoses, the
vent valve (V-2) left open and the isolation valve (V-3) closed (see Figure
2a and Figure 2b).
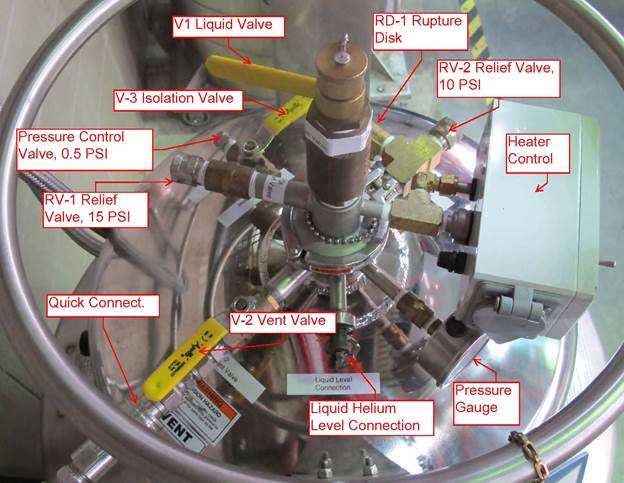
Figure 2a: Correct valve configuration at the holding areas.
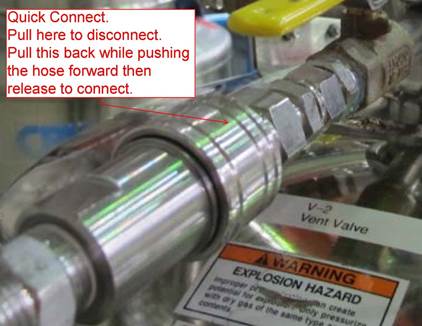
Figure 2b: Quick Connect.

Figure 3: Air pressure regulator
The cryogenic
valve on top of the Mother Dewar controls the flow of liquid to the Transfer Dewars. This is a pneumatic actuator air to open, the air
pressure is controlled by a regulator mounted on the fence, Figure 3. To be
able to automatically stop the fill a three-way
solenoid valve is installed between the regulator and the cryogenic valve.
The solenoid valve is controlled by the American Magnetic Model 1700 level controller
measuring the helium level in the Transfer
Dewar, Figure 4. When the solenoid valve is energized air pressure is
applied to the cryogenic valve (open) and when it is de-energized the pressure
is released (close). All the functions of the controller can be accessed from
the touch screen on the unit or the WEB http://helevel-td.triumf.ca/. The home screen displays the helium level
measured in centimetres, also shown in the footer are the MENU button to navigate to other screens and the autofill
condition. By pressing the autofill
condition button, one can select between the commands to AUTOFILL, manually start the fill M-OPEN or manually stop the fill M-CLOSED. These commands appear in red on white background, they do
not become active until the SAVE
button is pressed. Once selected and saved M-OPEN
and M-CLOSED change to blinking
red and the autofill function is disabled, be careful not to leave the valve in the manually open
position. As described later
the autofill function is not used to start fills but only to stop them, so once
autofill is selected and saved the condition will change to the blue FILLING seen in Figure 4.
The controller manual
can be found online at:
http://www.americanmagnetics.com/support/manuals/Model1700_Rev2_He_Only.pdf.
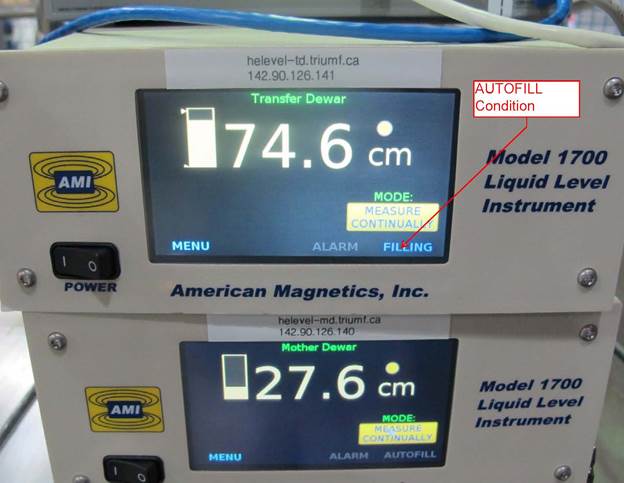
Figure 4: Liquid helium level controllers.
Connect the Transfer Dewar:
The quick connect fittings on the Transfer Dewars cannot be used during helium transfer. Because of the high boiloff the fittings O-ring freezes and leaks cold helium gas. These fittings must be removed, and the vent line connected directly to the Transfer Dewar Swagelok fitting (see Figure 5).
· Close Vent Valve (V-2)
· On the Transfer Dewar, loosen the Swagelok fitting and remove the Quick Connect fitting
· Install the Vent Line and tighten the Swagelok fitting
· Open the Transfer Dewar Vent valve (V-2)
· Close the isolation valve (V-3) upstream of the 0.5 psi(g) Pressure Control.
· Replace the brass fittings on top of the dewar with the brass fitting marked for the fill station (otherwise you will not be able to insert the transfer line into the dewar).
· Connect the Transfer Dewar Level meter cable.
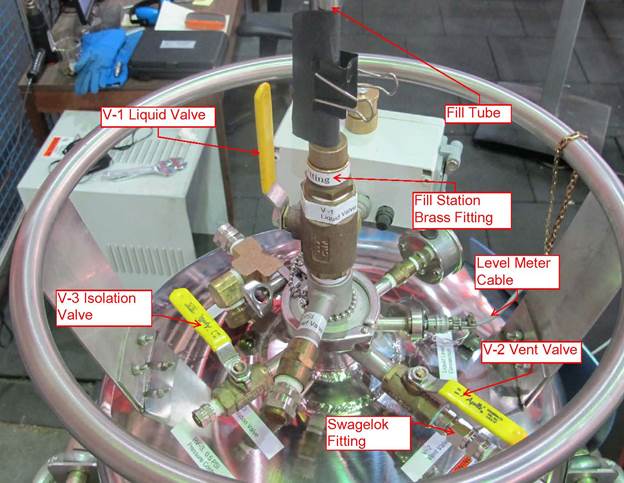
Figure 5a: Correct valve configuration at the Fill
Station.
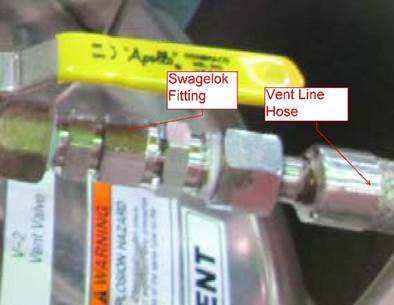
Figure 5b: Swagelok connection.
Install Fill Tube into the Transfer Dewar:
Check that the pressure gauge on the Transfer Dewar is at zero, that the fill tube (stinger) is dry and has the brass nut and O-ring to match the brass fitting on the Dewar.
· Put on all your PPE gear as per Safety Note 5.3 “Safe Handling and Use of Cryogenic Liquefied Gases” (Document-862): face shield, impervious apron or coat, cuff-less trousers, and high-topped shoes or boots, cryogenic gloves. Personnel transferring cryogenic fluids shall not wear rings, watches, bracelets or other jewelry, and avoid wearing anything capable of trapping or holding a cryogenic fluid in close proximity to the skin.
·
Flush
the transfer line:
1)
Release
the pressure from the gas regulator (if not zero).
2)
Manually
open the solenoid valve (blinking red M-OPEN).
From the Transfer
Dewar level controller touch screen press the autofill condition button
(AUTOFILL or blinking red M-CLOSED)
until the manual open command appears (red in a white
box M-OPEN), by pressing SAVE the
valve opens and the autofill
condition changes to blinking red M-OPEN.
3)
Slowly
turn the Pressure Control Valve clockwise until you hear some gas flow coming
out of the transfer line tip.
· Insert the fill tube into the top of the dewar then open the dewar liquid valve (V-1) and push the stinger close to the bottom (Do not push it all the way down, keep the weld on the stinger few inches above the brass nut).
· Tighten the brass nut.
·
If you
are ready to start transferring skip to the next section, otherwise stop the flushing
by manually closing the solenoid valve (blinking red M-CLOSED). Press the blinking red M-OPEN until the
command (red in a white box M-CLOSED) appears, then press SAVE. Confirm that the autofill
condition changes to blinking red M-CLOSED.
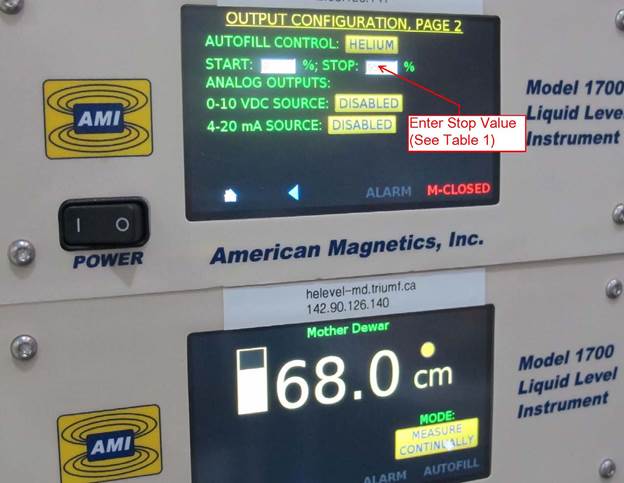
Figure 6: Enter Stop Value (%), See Table 1.
Table 1
|
Linear % |
Liters |
|
10.00 |
20.00 |
|
20.00 |
60.00 |
|
30.00 |
100.00 |
|
40.00 |
140.00 |
|
50.00 |
180.00 |
|
60.00 |
220.00 |
|
70.00 |
260.00 |
|
80.00 |
300.00 |
|
90.00 |
340.00 |
|
95.00 |
355.00 |
Start
Liquid Helium Transfer:
It is very important that the mother Dewar does not run dry, keep the liquid level above 16 cm (100 L) at all time.
·
Press
the MENU option on the touch screen
of the Transfer Dewar level
controller, followed by OUTPUTS then
PAGE 2 enter the (stop value) for
the fill (see table 1 and Figure 6) up to a maximum of 95 % (355 L), keep the
start value at zero then SAVE (after
saving the color of the new stop value changes from red to black).
·
If the
autofill condition is in manually
open (blinking red M-OPEN), press the button until the command (red in
white box AUTOFILL) appears followed
by SAVE, the autofill condition will
change to (blue) FILLING. However,
if the valve is manually closed then open it first before turning the autofill
on.
·
Return
to the home screed and change the MODE
by pressing the SAMPLE AND HOLD
button to MEASURE CONTINUALLY.
·
Increase
the pressure on the gas regulator to 15 psi.
The
fill will stop automatically when the liquid level reaches the pre-set value.
Removal the fill tube from the Transfer Dewar:
· Let the dewar warm up, this will take about an hour.
· Check dewar pressure and make sure it is at zero
· Put PPE
· Loosen the fill station brass nut. Once free pull the fill tube out of the Transfer Dewar in one fluid motion. Once completely clear, close the dewar liquid valve (V-1).
· Replace the brass nut with the original fitting. Leave the one marked for the fill station on the table.
· Disconnect the Transfer Dewar Level meter plug.
· Open isolation valve (V-3) upstream of 0.5 psi pressure control valve.
· Close the Transfer Dewar vent valve (V-2)
· Loosen the Vent line Swagelok and remove Vent line
· Install Quick Connect fitting back on the Transfer Dewar
· Move the dewar to one of the designated holding areas connect the return hose, open Vent valve (V-2), close the isolation valve (V-3).
Connecting
Dewars in the Experimental Areas:
When the dewars are used in the experimental areas the recovery line should be connected directly to the Transfer Dewar Swagelok fitting. For reasons discussed before do not use the quick connect. Also, it is important not to completely empty the transfer dewars, keeping about 10 L (7 cm) of liquid in them will prevent air from getting in and keeps the dewars cold for faster refill. Empty dewars should be returned to the designated holding area in the Meson Hall.
PSD
training record for filling helium dewars at the
liquefier:
Name: Date:
|
The person is familiar with the document describing the procedure for
transferring liquid helium from the Mother Dewar to the Transfer Dewar when
the liquefier is running. |
|
|
They know the function of all the valves, relief valves and pressure
gauges on the Transfer Dewars. |
|
|
Understand the function of the various parts of the auto-shutoff fill
system: level controllers, pressure regulator and 3-way solenoid valve. |
|
|
Can connect the Transfer Dewar at the fill station. |
|
|
Knows how to install the fill tube into the Transfer Dewar. |
|
|
Can start liquid helium transfer, know how to program the auto-shutoff
level into the Transfer Dewar level controller and start filling. |
|
|
Knows how to manually stop the transfer from the controller and by
releasing the pressure from the regulator. |
|
|
Can remove the transfer tube from the dewar
and safely remove the dewar from the area. |
|
|
Able to connect the dewar to the helium gas
collection system at the holding and experimental areas. |
|
|
|
|
Physical Science Division Liquid Helium Coordinator: